You’re making your game, testing it as you add new features. Man, it’s pretty fun. But something’s missing, it’s too quiet. You need some music. Sure you could go and download some music available online for free, but that’s not gamedev, that’s using other people’s work. So, let’s make our own music. This is how the music you’re making is going to sound:
We’re going to make this chip-tune music with no experience making music. All you need is some creativity and the ability to tell that something doesn’t sound quite right. All software needed will be free or open-source. You won’t need any additional equipment.
Making music isn’t easy. It’s not super hard either. Sure, you could be a musician and study composing etc etc, but we’re making a hobby game, we don’t need that much knowledge. I’ll take you through how to make music step by step.
The second article in this series starts to go into orchestral sounding stuff. So if chip-tune isn’t what you’re looking for, stick with this article so that you can move onto the next.
What You’ll Need
This list is just what you’ll need for this quick and dirty chip-tune. Don’t consider this an exhaustive list.
DAW – Digital Audio Workstation
A DAW is what you’ll usually call it. It’s a digital version of one of these:
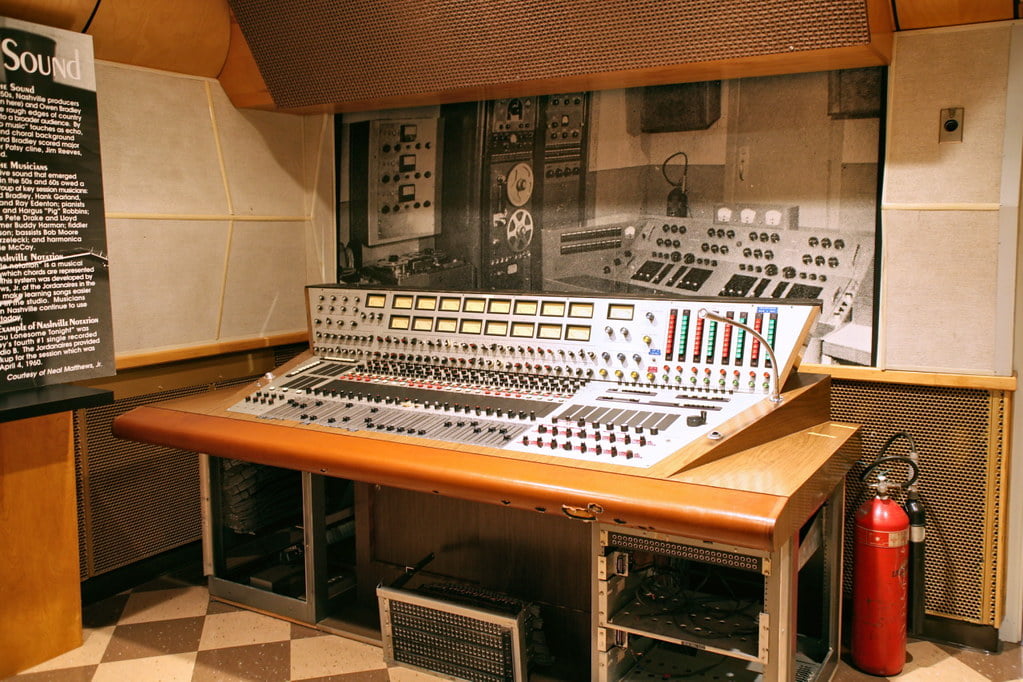
Nowadays, even professional recording studios are using a DAW but they plug all those controls you see there into the computer.
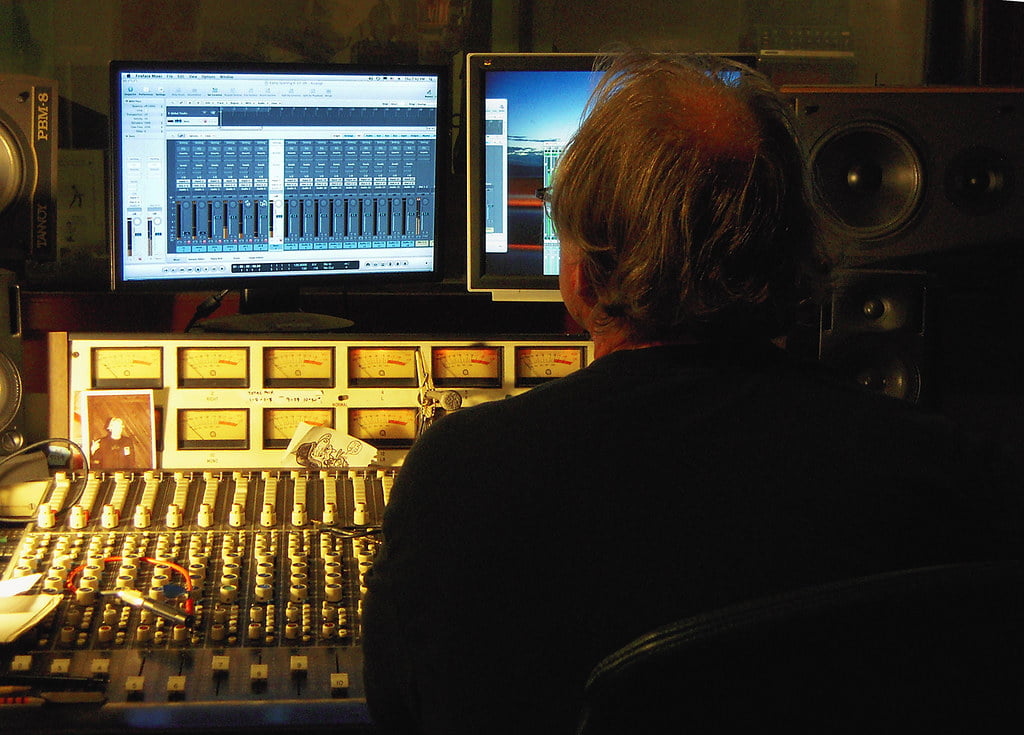
This is great for you and I, because we don’t need those fancy controls. Hell, we’re not even going to use a piano keyboard, we can do all this with a mouse (I exclusively use a laptop with a trackpad for all my development).
DAW’s have lots of great features. They have piano keys in them, recording options, MIDI options, laying down notes to be played by Virtual Instruments. They can then export to a variety of file formats.
There are a lot of different software options. And most of them cost money. I don’t know why, but game developers all seem to be willing to fork out money for a DAW. To be fair, for the longest time, there were no alternatives, you either bought one, or pirated one.
But not today. No. Now you can download a free, open-source DAW that is fully featured and just amazing. Download Ardour now.
VSTs – Virtual Studio Technology Instruments
A VST Instrument is a virtual instrument, it’s right there in the name. It plays notes that are sampled from the real instrument. Depending on the quality of the VST, it may internally contain hundreds of audio samples of the instrument it’s pretending to be. It may only contain a few. As a general rule, the larger the file-size, the more samples it contains inside.
A VST works by playing the notes from MIDI signals. Back in the olden days, we used to have MIDI synthesizers that came with the Operating System. So I could play a MIDI note C3, and the synthesizer would play a C3. I would tell the synth to play a piano sound, or a trumpet sound. I could play the note via a keyboard plugged into my computer, or by laying it down in a sequencer in the DAW.
But they sounded terrible. Oh god. They’re still there lurking in your operating system, sounding terrible. To be honest they are a lot better than they used to be.
VSTs replace the terrible synthesizers with actual sounds from the instrument. You can get anything. And a lot of it is free. We’re going to get a couple in particular that work well for our quick and dirty purposes. They don’t sample instruments like a virtual trumpet might, we are making chip-tunes here, but they do sound better than the horrid MIDI sounds on your computer today.
PULS
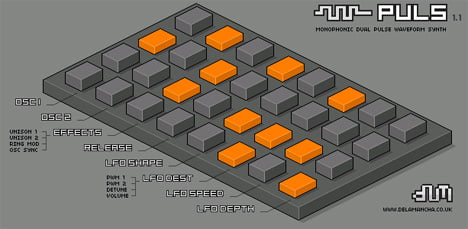
You can download PULS here. It’s a very simple synthesizer with very limited options, which works for us, because we don’t really know what we’re doing (not yet anyway).
Blue ARP
Download it here. This one is a VST, but it’s not an instrument. It’s a pattern sequencer… or I think of it as an effect/plugin that is applied to other VSTs.
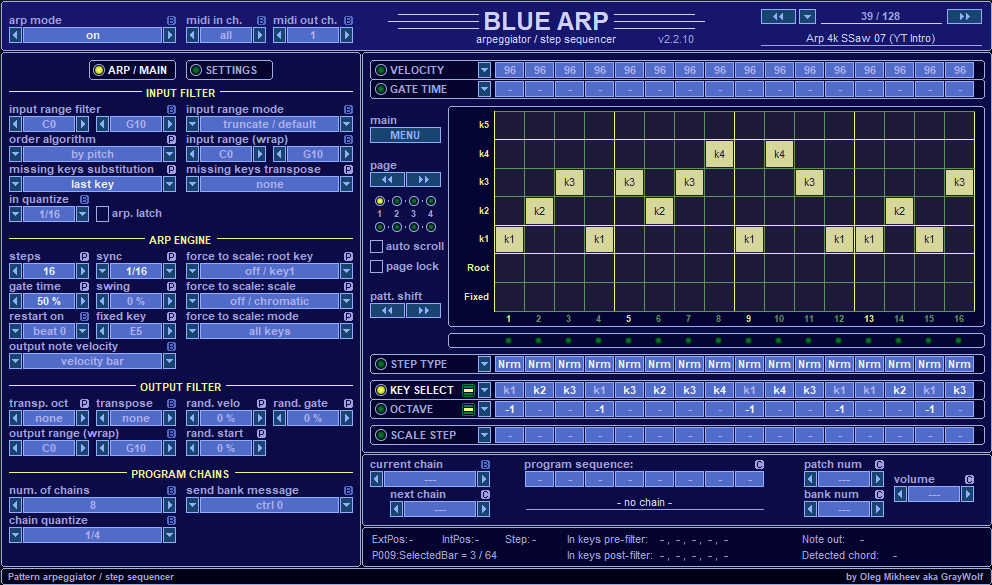
Basically, it modifies the MIDI input, i.e. us holding down a C3 note, and turns it into a pattern of different notes. The correct term is a MIDI Arpeggiator.
Melody Generator 2
This is a peice of freeware developed by Dirk-Jan Povel to accompany a paper he wrote. It’s hard to come by, so you can get it here for Windows or Mac. This software will generate a melody for us.
Dirk-Jan Povel died, which is terrible, because it means that Melody Generator 2 is unlikely to be advanced. Thankfully, having written the paper linked above, and because the software contains quite a bit of theory in the help docs, there’s hope than one of us bored developers will continue his awesome ideas.
Unfortunately it isn’t available as a VST plugin, that would be amazing (hint hint). But it can produce MIDI files, and if you remember from before that VST instruments are just playing MIDI notes, you’ll understand what we can do with it.
That’s it. That’s everything you need. Four downloads.
Installation
Install Ardour, it’s not hard. You’ll probably want the 32bit version because the above VSTs are 32bit. You can get bridges to get 32bit VSTs working in 64bit software, but I’ve not found a solution that works for me yet. Most free VSTs are 32bit, and if they have a 64bit version, there’s a 32bit build as well, as a general rule anyway. 64bit gives you access to more RAM, which for our purposes probably isn’t going to be a limiting factor, but when you’re using one of those massive VSTs with gigabytes of samples for the single instrument it plays, you’ll need it.
Next you’ll need to place the VST files in the correct folder location. I personally create a new folder and just tell Ardour to look in there as well as the normal locations (we’ll get to that next).
That’s it. Installation done.
Configuration
Ardour is usually very simple to configure. I’m developing on Windows, so your steps might be different on Linux.
First open it up and create a New Session. You can define the folder location here if you want.
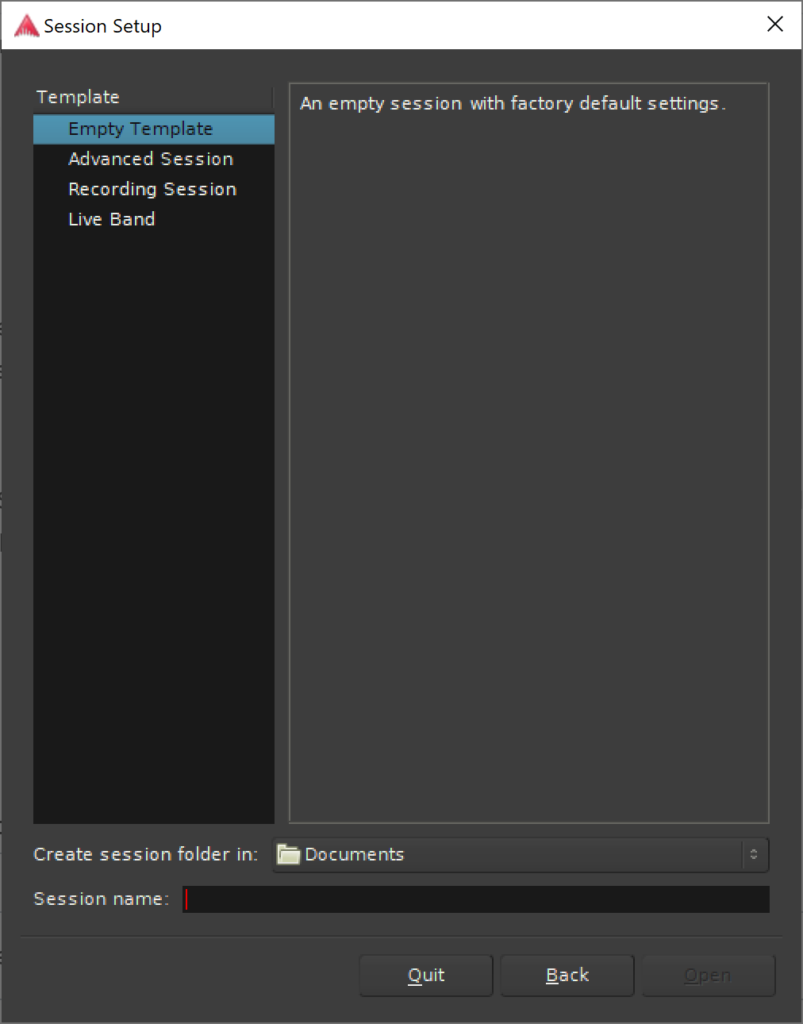
Select “Empty Template” and then “Open”.
Next you’ll be given the audio configuration options. This part can be a little hairy if you aren’t familiar with these sorts of things.
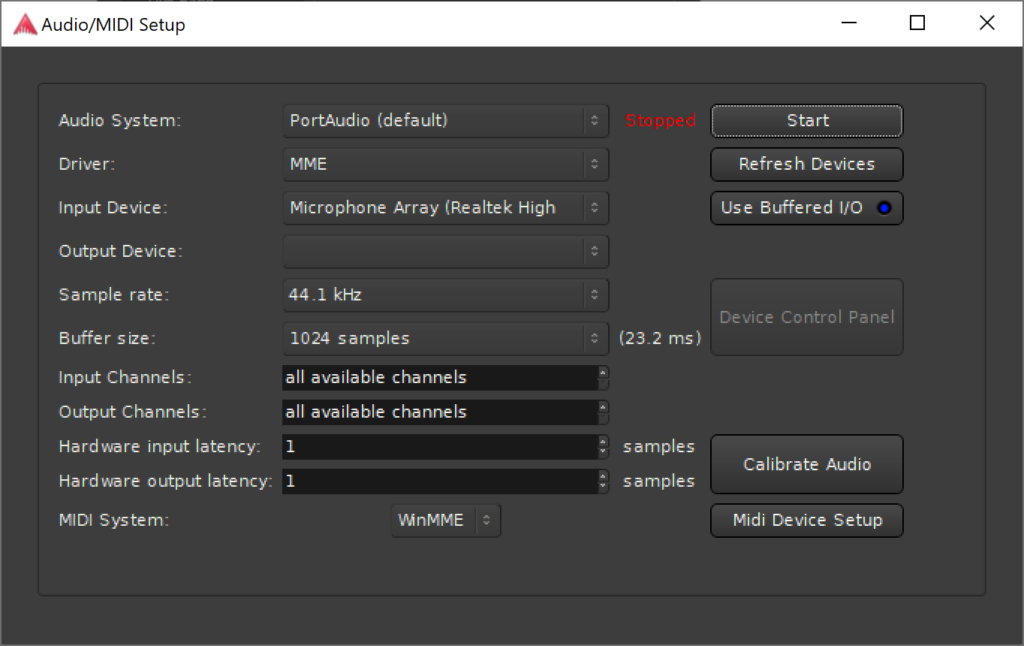
Audio System should be the default.
Driver will depend on what sort of sound card you have. ASIO drivers are low latency, meaning you can plug an electric guitar directly into your computer and use guitar effects in the DAW. If you try to do that without ASIO there’s a signal delay, measured in 100’s of milliseconds, which really screws up your timing with the beat.
A good ASIO driver will give you a latency <40ms. You can buy outboard sound-cards for not too much money, that provide extremely low latency and let you plug in piano keyboards, microphones, and guitars.
I’m not doing any of that, I’m just playing tracks laid down in MIDI signals, so I will select MME.
Input Device doesn’t matter, we’re not recording sounds. Output device doesn’t matter much here either. What is important is that the Sample Rate is set to 44.1kHz. Everything else can remain as is. This is only important because this is the standard you want for music tracks.
Click “Start” and hopefully you get no errors. Ardour will start up and scan directories for VST instruments. You’ll eventually see something like this:
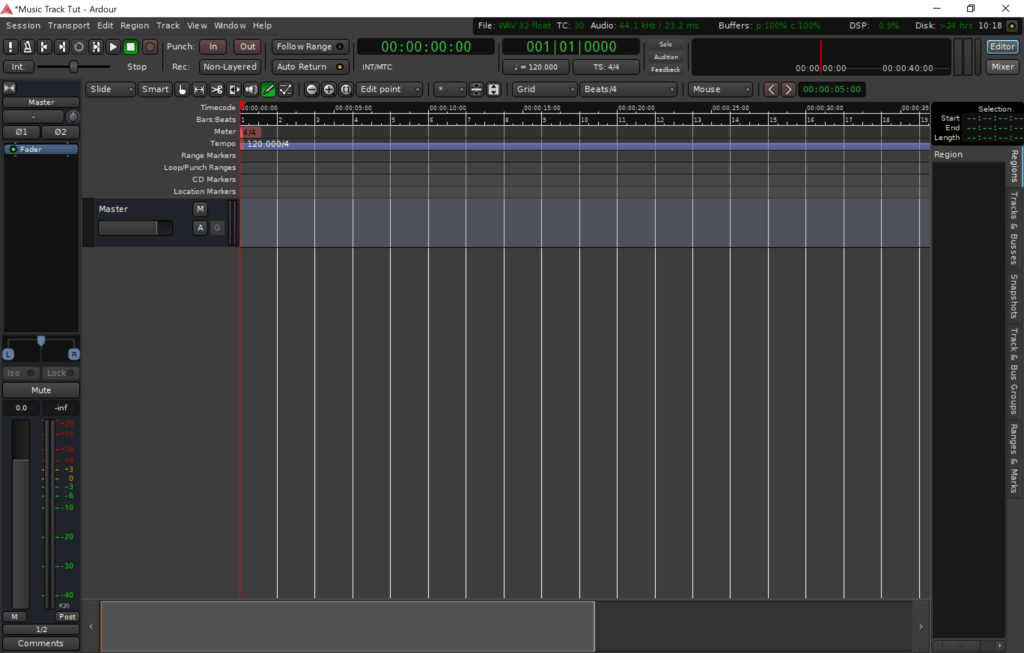
If you don’t, look for an “Editor” button in the top-right and click that.
Next we just need to tell Ardour where our VSTs are (if you didn’t put them in one of the normal system folders). Do this by selecting Edit > Preferences from the menu. In the Preference you should click Plugins > VST from the left-hand navigation and then you can Edit the path to the VST folder.
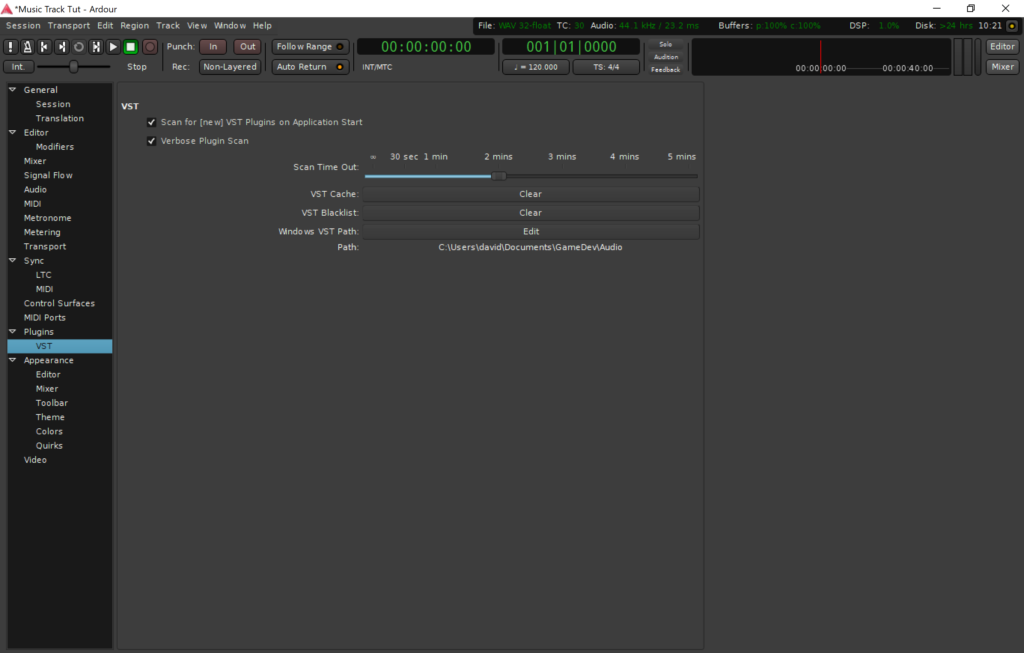
When you’re done you can click Editor in the top-right again. And we’re done, everything is configured and ready to make some music.
Lay Down a Bass Beat
This is the easiest part, and to be honest, for some games, and some scenes, you can get away with stopping here.
Add a new MIDI track to your Ardour session. Just right click and add track, or use the menu Track > Add Track, Bus or VCA….
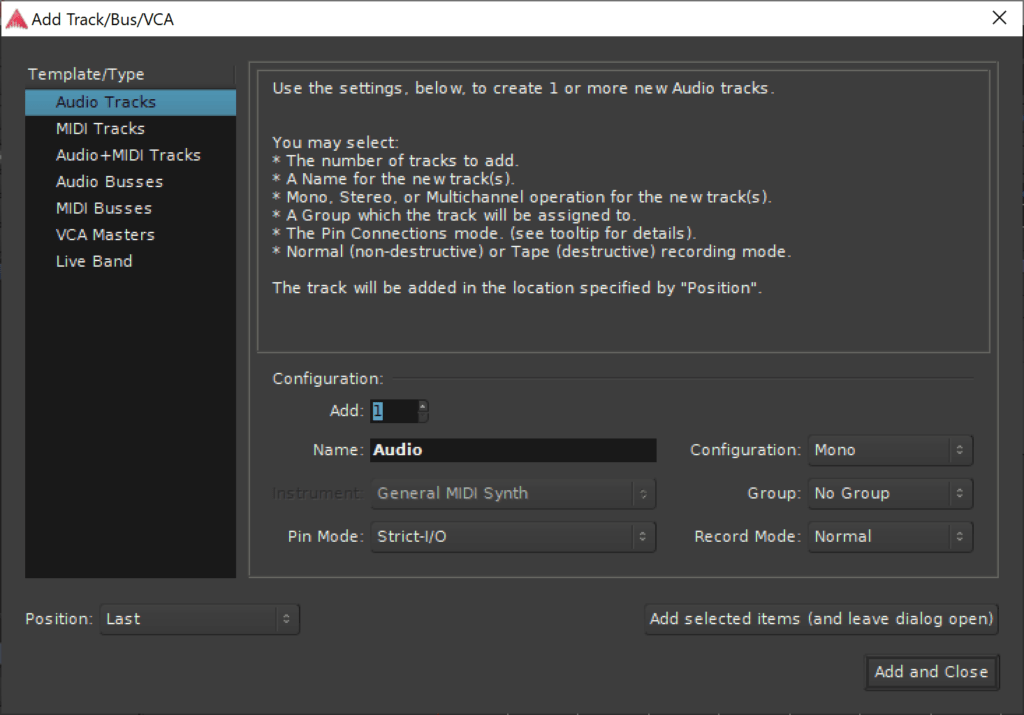
This gives you a whole bunch of options. Select Midi Tracks from the left-hand side and then under Instrument in the main panel, you want to select our simple synthesizer, PULS (for me it’s labeled “PULS_1_1”). Once the instrument is selected, hit “Add and Close”.
Now there’s a new track on your editor, you can expand it by hovering near the edges until you get a resizer cursor. This should expose a little keyboard. Go ahead and press a key with the mouse. If you don’t hear any audio then something is wrong; comment on this article and I’ll try and help as best I can.
When you have your track selected, it’s red, the left-hand side of the window will have a couple of little doodads.
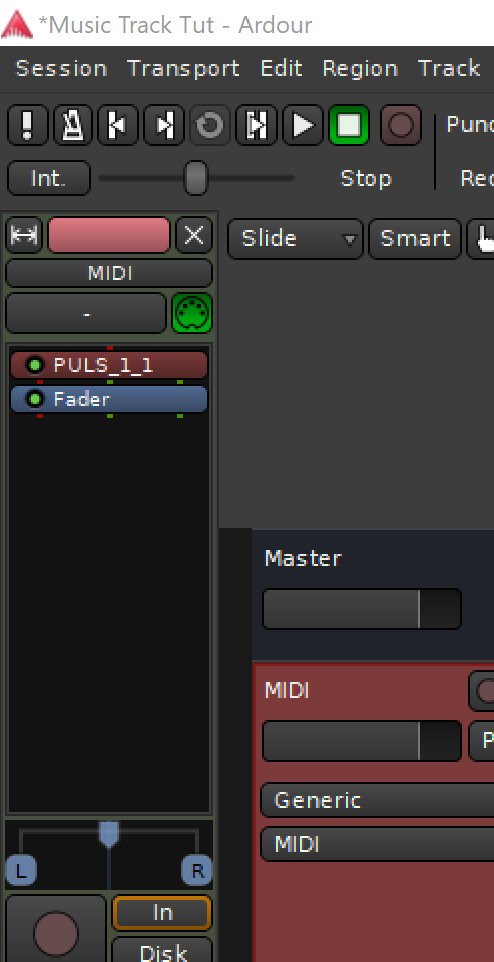
Where you see “PULS_1_1” you want to double-click it. This will bring up the VST’s window. All VST’s have a window, even the most simplest of all must have a window. This often has a weird interface designed by the VST creator, there’s no rhyme or reason to the layout of the controls in here. In fact, there are some VSTs that I haven’t used because I can’t figure out how to control them.
But each of these controls is usually something that you can programmatically change via MIDI controls. You see MIDI isn’t just the notes your playing, it’s also a bunch of control signals. DAWs like Ardour will let you send these signals based on curves and graphs that you draw. I.e., you can gradually increase the volume, or gradually turn some knob from 0 to 100 over the course of several bars of music (who knows what the knob does, that’s the VSTs problem, Ardour is just sending the signals).
If you have a midi controller, or invest in one, you can wiggle knobs and assign them to controls in the VST (you’re starting to build that music studio in the picture at the beginning of the article). Eventually, you might want to invest in this, not because you know how to play a piano, but because it will make hearing samples and tuning parameters a bit easier when making a lot of music, or getting more in-depth into music.
Keep all that MIDI control stuff in mind for the future when you’re experimenting.
Alright, back to the bass line. You should see this:
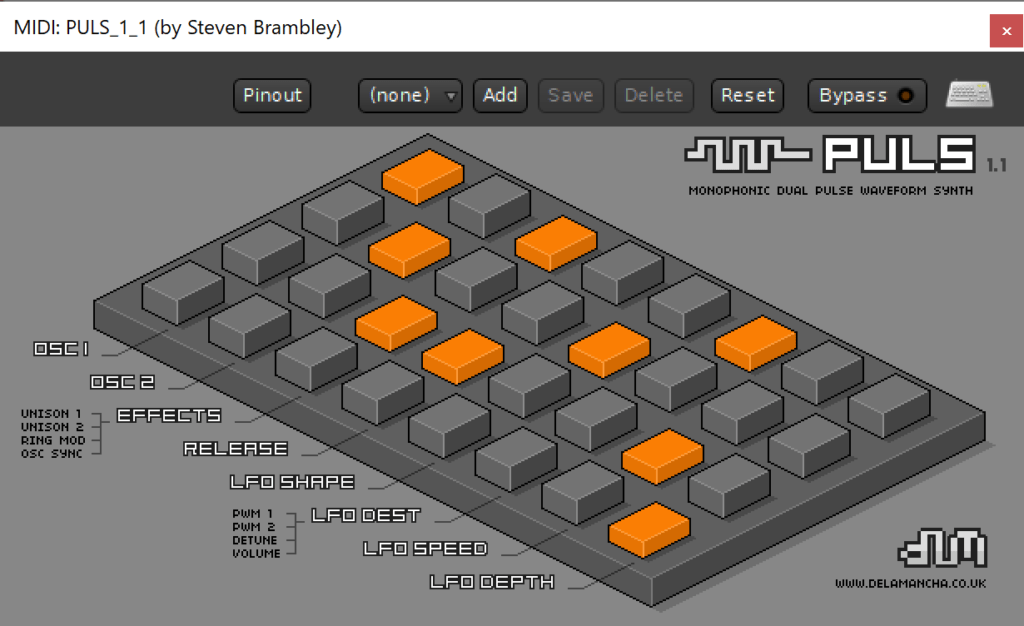
Go ahead and change those little orange guys as much as you like. Play one of those keyboard keys back on the track in the main window to hear what you’re doing. But make sure you’re playing a C3 or lower, they are the bass notes that we want to hear (scroll the keyboard down with the weird scrollbar to the left of the keys). Here’s some tips:
- OSC1 & OSC2 are oscillators. They are sort of like a sin-wave generator. They are the “noise” producers.
- Effects are interesting, each of those buttons turns the corresponding effect on or off.
- Release is how long the note fades out for, the top-right button being the longest, and all of them off being the shortest.
- LFO is “low-frequency oscillation” and produces long sweeping effects, or at least that’s what they’re typically used for. Basically, they produce a wave, just like the oscillators, but instead of generating sound, they gradually increase and decrease one of the parameters of the synthesizer. If you picture a sin-wave, the top is 100% and the bottom is 0%, this is then used to change, for example, the volume of the sound. So when the LFO is at the top, or 100%, we have full volume etc.
Different synthesizer VSTs have different options for LFO destinations. This is a simple synth, so simply options. But they can get super crazy. - LFO Shape is the shape of the wave that the LFO is playing. Your options are sin, triangle, sawtooth, and square
- LFO Dest is the destination of the LFO signal, just as I describe above.
- LFO Speed is how fast the LFO oscillates. Or put another way, how quickly it plays through that wave-shape selected
- LFO Depth is how far up and down that wave-shape goes
Once you’ve got your sound, you can close the VST window.
Now we want to add Blue ARP to our track. We want to do this because we don’t have any idea how to make music, and music is math, and the computer is a big calculator, so surely it can do it for us.
Right-click in the doodads box and select New Plugin and look through the additional menus until you find BlueARP. You’ll get a confirmation dialog like this:
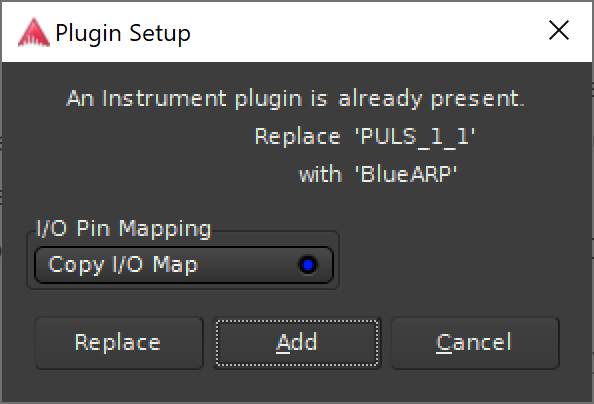
Select Add. We don’t want to replace the existing PULS instrument, we want to add a new one. Now, I wouldn’t call BlueARP an instrument, but in the world of VSTs, there’s not really a distinction.
You see, VSTs can output signals and also take on the output of other VSTs as inputs. They can be chained together (depending on whether that’s something your selected VST does) and can produce some weird, exciting and amazing effects.
After you’ve selected Add, Blue ARP may open on it’s own. That’s fine, but first, you need to move it’s little doodad in the doodad box, and place it at the top, before PULS. Your doodad box should look like this:
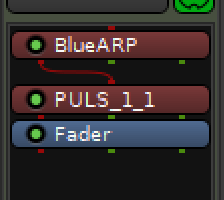
This says that Blue ARP is going to output to PULS. BlueARP is going to change the MIDI notes that we enter.
In the Blue ARP window, near the top-right, there is a dropdown control that says “01 / 128”, open this dropdown and select something else. After you selected one, go ahead and hit a note on that keyboard, but keep it held down.
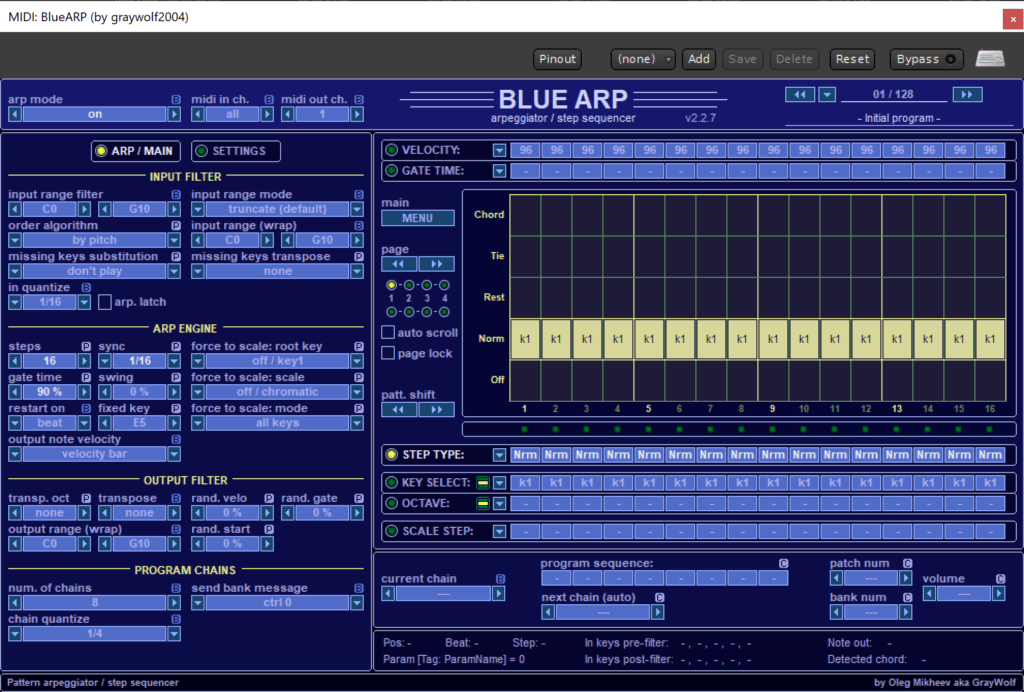
WOAH! That sounds cool, huh? I selected 51.
Of course, you can make your own, but you’ll need to learn quite a lot of these controls. Go for it! It’s not overly hard, just outside the scope of making quick music. There’s enough presets in here for me.
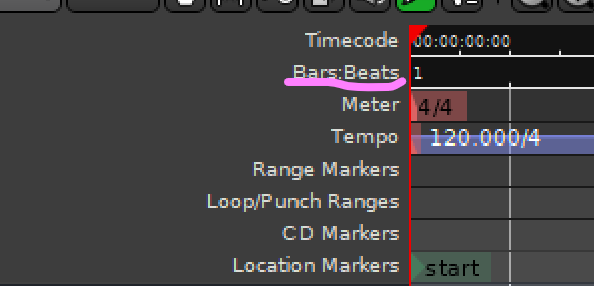
We can close the VST window once we’re happy with the sound we’re making. Back on the editor screen of Ardour you want to make sure the little pen icon is selected, and that we’re snapping to the grid on every beat. Let’s also make sure we’re at about 120 beats per minute and in 4/4 time signature.

Now click in our track at the very start, and drag the box out to about 20-25 seconds or something. In reality, you’ll want to lay down a longer song, but we’re just doing a quick one here for demonstration purposes.
It’s important that your box starts at the very beginning of the track. It might help to click at about 20-25 seconds and track back to the start. Now as you move your mouse around that new box, you’ll see a green rectangle. That’s where you’re about to lay down a note.
Pick a note from the beginning of the track, start at the very beginning, and drag it out to the end. I selected an F2. Once you’re done, hit space-bar a few times until you hear you music being played.
Awesome.
Feel free to change the length of your note and add some different ones. For now, don’t overlap them, and don’t change them too often, this is a bass beat afterall. Here’s what mine looks like:
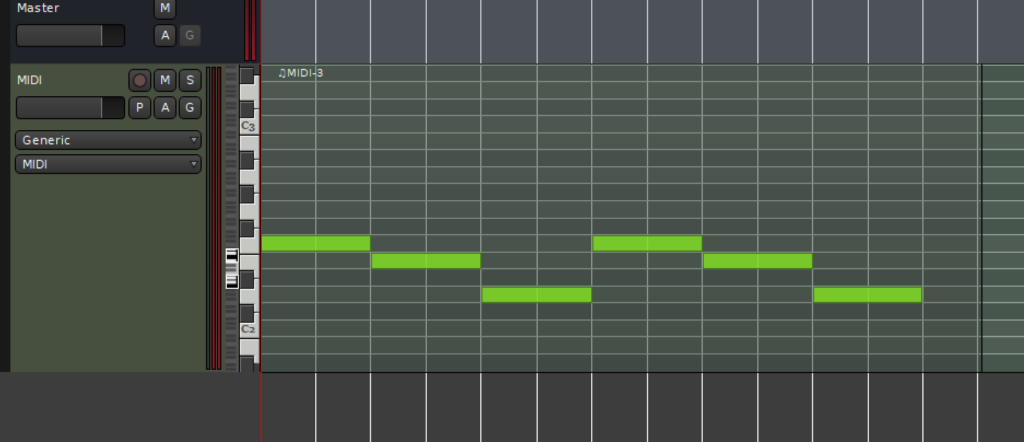
And we’ve got our bass line ready.
Craft a Melody
Let’s leave Ardour in the background for a moment and open up Melody Generator 2. Compared to more… commercial software, this thing is ugly.
But it gets the job done. The interface is tricky, and janky, but the results work and it’s free. So here’s what we do.
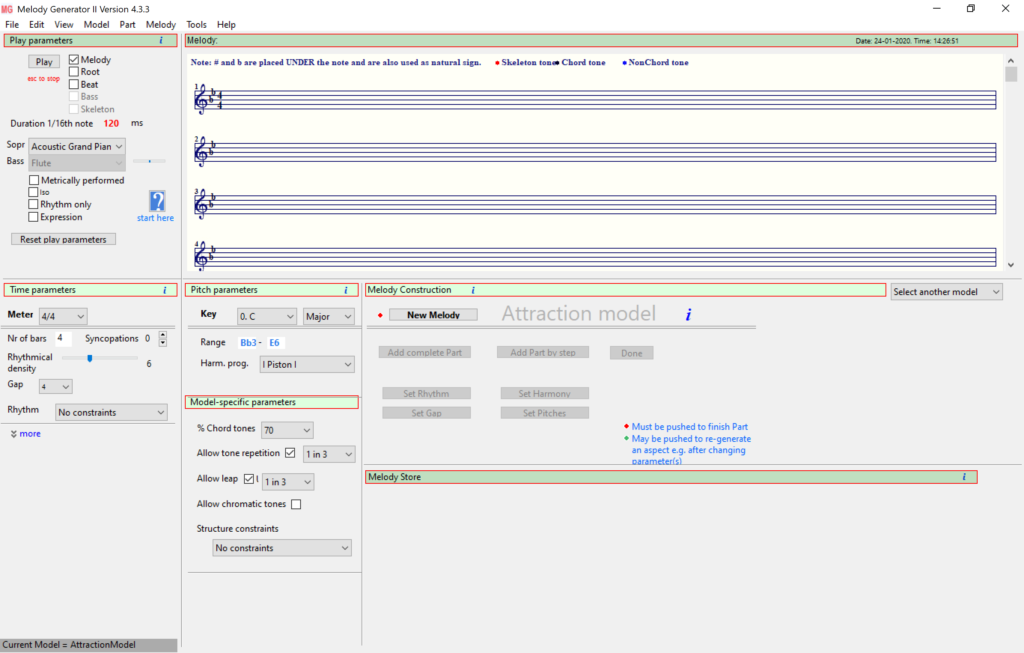
Set the model to the Attraction Model. You can play with the others as well, I just find that this makes the best results. Under Meter in the left-most panel, you should have 4/4 selected as this matches what we did in Ardour.
I created 12 bars of bass in Ardour, you can tell because the bars have a thicker white line from top to bottom across the tracks. There’s also little numbers along the top of the tracks under Bar:Beats to tell you.
So set the Nr Bars in Melody Generator 2 to match.
Next you need to change the Key in the Pitch Parameters panel to match the notes you placed in your bass beat. You can basically google “F-Major” scale to see what notes “fit” into F Major etc, you probably should make sure your bass notes align with a scale of some sort. Make sure the scale you used for your bass-line is what you select here.
Leave all the other settings for now. When we’re done here you can play around and see what they do.
Click New Melody in the Meleody Construction panel. Then just under it you can click Add complete part.
Boom, you’ll have a heap of music now written in the window.

On the top-left panel you can click play. Sometimes the window hangs while it’s playing, but it doesn’t matter, it’ll come back when the music is over. You can change the MIDI instrument used if you want, but piano is good enough for now.
Feel free to hit some of the other buttons in Melody Construction panel to randomise bits and regenerate it. There’s a couple of options in the drop-downs that say “No constraints”. Changing these will result in a melody that is more repeated sounding, which is often what you want.
Whenever you’re done press Ctrl+M or in the menu Melody > ExportAsMidi. Save the file somewhere.
Go back to Ardour and select Session > Import from the menu and import the .mid file we just exported from Melody Generator 2. You don’t need to change any of the import options just yet. When it’s done, you’ll have two new tracks added, delete the second one, it was for the other hand which we didn’t generate in Melody Generator 2 (you play a piano with two hands, right?). To remove the track, right-click it and select remove.
Now select our new track that has notes in it. In the doodad window, add PULS to this track as well, you know how to do that already, but this time replace the existing instrument. Also, change the output from Master to out 1+2.

When everything is setup you can hit space-bar and listen to your new song!
Polish it up
Now, assuming you followed some sort of scale when placing bass notes, you should have both parts in key. You might try re-generating melodies until you get something that fits, or, you can just move individual notes in the melody up and down, or remove them completely, if they don’t “sound” right.
This part is all wishy-washy, but you will likely need to do a little polish to get everything good. Give it a go.
Export
Now, in Ardour select Sesson > Export > Export to Audio File(s). You’ll want to match my settings here, but really the important thing is the file-format. Everything else is already set to a good setting.
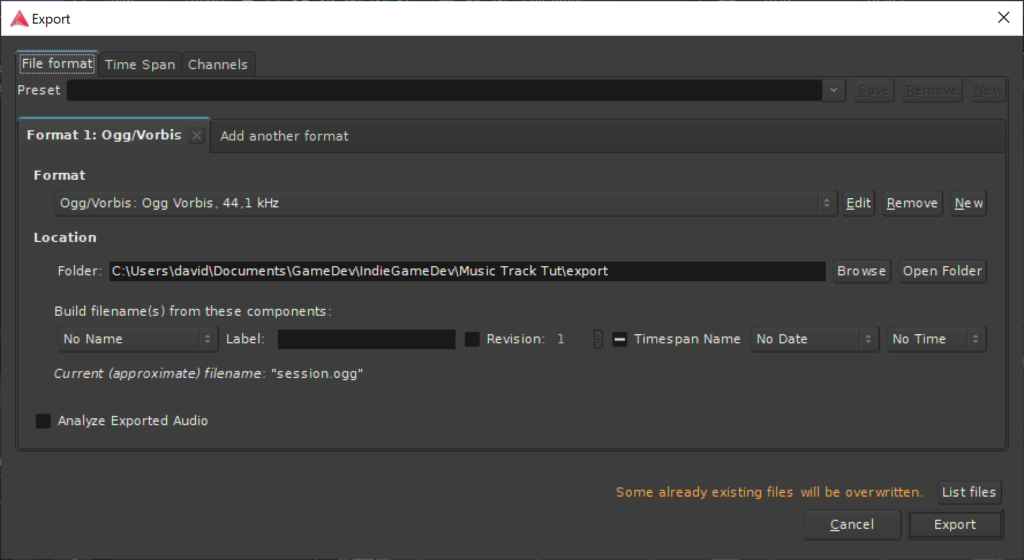
Here are my results, all I did was edit two notes from the melody.
Next Steps
That’s it for making quick tracks. But here’s what you do next:
- Play with the settings in the software you have, learn how to make various random melodies, stuff that’s more energetic (more notes), stuff in minor keys with less notes.
- Get more VST instruments. Using these same tools, you can generate orchestral sounding music as well. There’s tonnes of free VST instruments on the internet.
- Make longer music. You’ll want to repeat phrases again and again. You’ll want to change one instrument’s phrase while the other remains the same etc.
- Add more instruments. You’ll probably never use more than a handful to be honest.
- Learn a little more about making music. Scales, keys etc. It’s not difficult stuff when you’re able to hear instant results in this sort of software.
- You’ll probably need to know how to stream it in your custom game engine too.
Of course, there’s also the second article in the series which talks more about music theory, notation, and moves us into playing orchestral sounding things.
I really hope you enjoyed learning to make your own quick chip-tune sounding music for your games.
Really appreciate the work you’ve put into this guide. I’m not far in yet but my Ardour interface differs a bit from your screenshots (it’s been a few months since this was posted). Where would I click here to see the PULS VST interface? https://i.imgur.com/ggH5ZrC.png
Thanks!
Hey, my fault. I clicked around for awhile and I had to check “view->show editor mixer”
Hey just FYI, take a look at Cakewalk Sonar. It’s free now, and I’ve found it a lot more stable than Ardour.
Cool, I will. Thanks!
I am not sure if it has changed so quick since you wrote this guide but Ardour is not free, Unless I want a demo version or am able to build it from source code.